Before we go deep into 3-rd party fonts, think it's important to describe the general situation in this entire subject of putting text and monograms on your projects. By saying "3-rd party embroidery alphabets", we relate to digitized fonts that are not built into your machine, or embroidery software.
First - most embroidery machines include a few simple, most basic alphabets that you can easily use. Letters there are always re-scalable; you can adjust their size to fit your project.
The same about embroidery programs that include limited number of pre-digitized fonts. The fonts there tend to be very simple, but still comfortable to use because you can type your desired "embroidery words" with keyboard, and adjust their size easily.
So, why do we constantly search for other alphabets?
Simple. Because the letters that can be found as "3-rd party fonts" tend to be a lot more beautiful than the "built-in" ones.
There is a reason why "built-in" fonts can't be fancy. Because they must be re-sizable to more or less any size you wish, because they're built into your embroidery machine, and have to fit by size for everyone who owns this machine.
The problem is that technically, you can digitize either something really nice but in limited number of sizes, or something really simple, but foolproof in terms of resizing.
So, if your project asks for fancy letters - don't waste your time searching your embroidery machine or embroidery program.
3-rd Party Fonts Basics:
All 3-rd party machine embroidery fonts work just like regular embroidery designs. At least we're not aware of other options.
Each letter comes as separate file (design). And you can combine letters together to create your own text, or monograms.
To join a few letters, you may use embroidery-editing software. For instance Embird, the software we so much in love with.
Make sure that the letters combination you've made can fit into your hoop. With small letters it's rarely a problem unless you try to write A LOT OF TEXT at once.
If you want to use large letters, and also create words with them, not only monograms - you'll need to embroider the letters one by one (or in small combination).
| Joining Letters, or Other Designs, Using Embroidery Software |
|
If you want to stitch more than two separate designs in one hooping, merging them via embroidery software can save your time. Here are some basic steps for joining embroidery designs. They are correct for any embroidery editing software:
1. Make a backup copy of your original designs.
2. Decide what hoop size will be sufficient for your new creation, and selecting it in your software (you must have such hoop, of course!).
3. Copy all parts of your new creation (largeA.pes, smallN.pes etc) into a single file. Arrange them on PC screen according to your needs. Make sure you keep within the correct hoop size.
4. Do all last moment adjustments, such as:
- Sorting colors to eliminate unnecessary color changes - Centering design in hoop - Recoloring design to match your project - Resizing the whole composition. If you decide to re-size, be aware that there might be a serious loss in quality. Always test stitch carefully and save the original size designs aside as backup. Resizing fancy stitches & backgrounds, or changing design size over 10 - 15% will be problematic almost for sure.
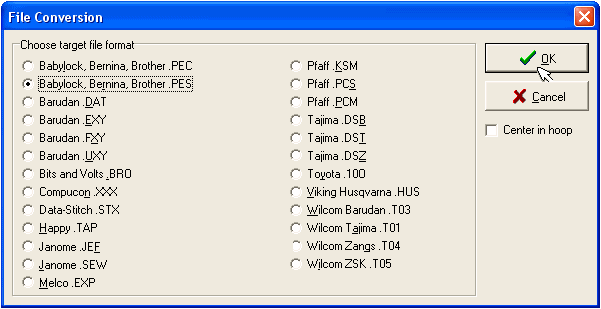
5. When everything looks fine - save your new composition in format that fits your embroidery machine. Make sure you save it under a new file name (e.g. yourname.pes), to prevent overwriting an existing design or letter.
6. After the new letters or designs combination is ready, just transfer it to media type that your machine can read.
See below an illustrated instruction of "joining letters" procedure using Embird:
|
| Joining Embroidery Designs via Embird |
|
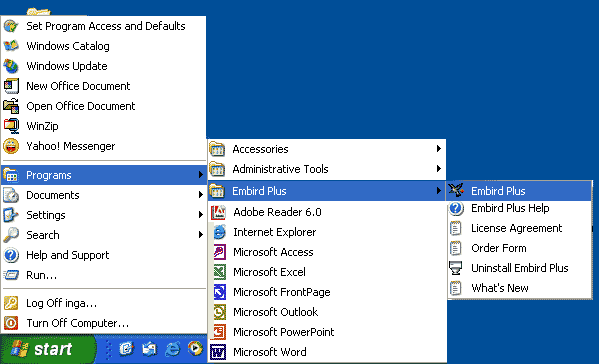
1. Open Embird program ( Click "Start" => "Programs" => " Embird" ):
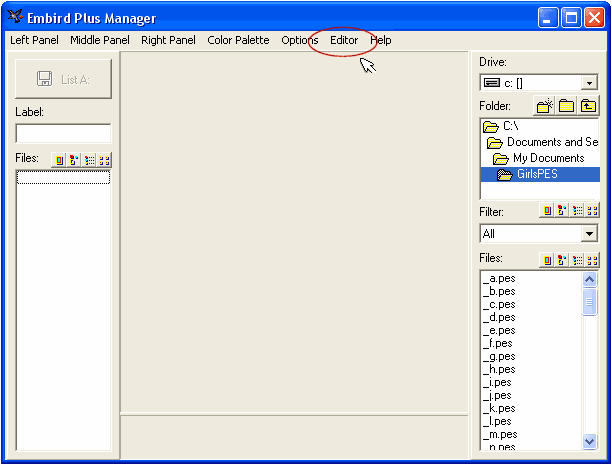
2. When Embird is open, enter editing mode by clicking "Editor" button, located on Embird's top menu.
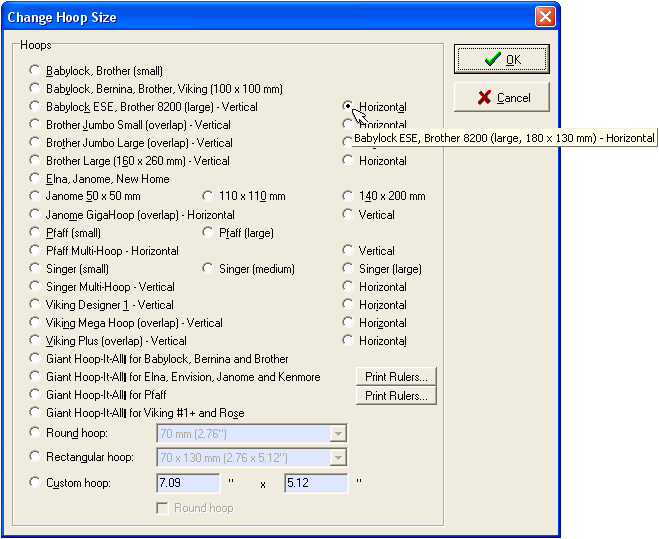
3. Update the size of virtual hoop to maximum hoop size you can use. To do this, click "Options" --> "Hoop Size", and select from the list the largest hoop that you own, and can use. You can switch to smaller size later.
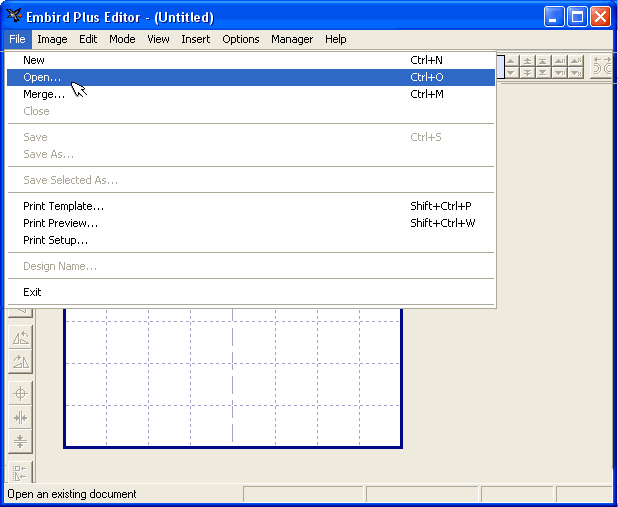
4. While being at "Editor" mode, click "File" --> "Open", to open the designs/letters you want to join together.
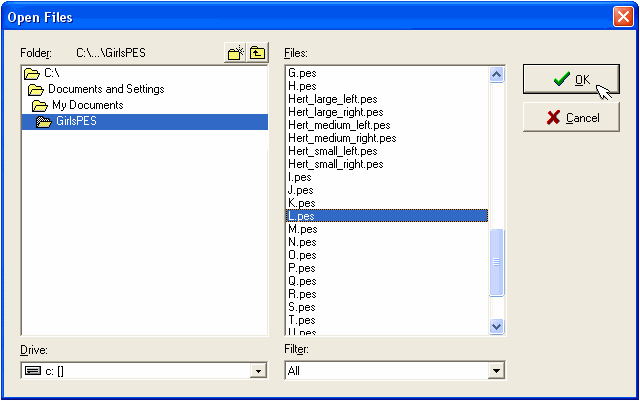
5. A small file navigation window will pop up. Navigate to the folder (folders) where the designs/letters you want to join are located. While holding "Ctrl" key on your keyboard, mark all the files you want to open using your mouse cursor. When finished, click "Open" button on files navigation window.
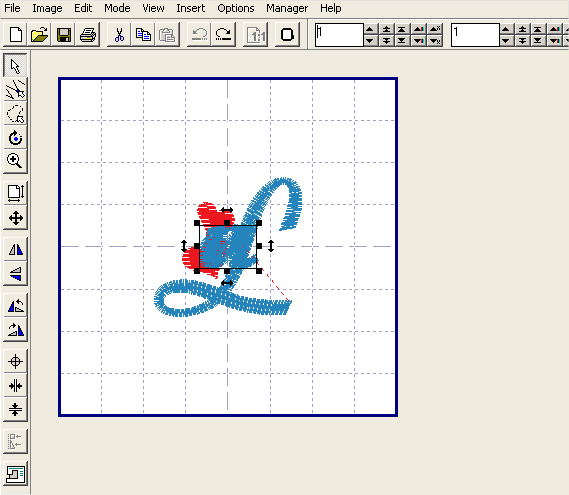
6. The letters we've picked up for this example are L, a, u and r, because we want to create the name "Laura". You see that all these letters got copied (in huge mess) into the virtual hoop. Now, using your mouse, drag each letter. Position them all in correct order, and align well. You see that there's a small problem - one missing "a" to finish the name. To add another "a", mark the first one with your mouse, then click "Edit" --> "Copy", and "Edit" --> "Paste". Drag the second "a" to it's correct place.
 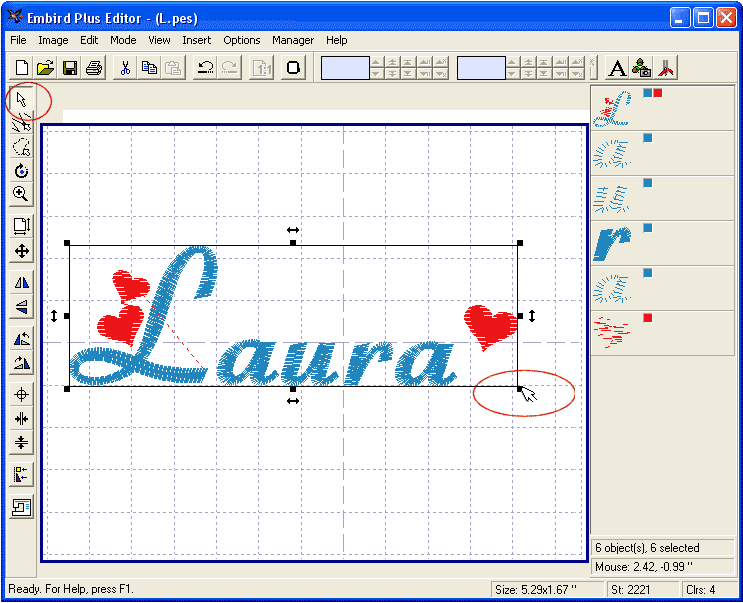
6. Now, when visually we've achieved the desired result - let's center the entire word into the hoop, and reduce the number of color changes. As you see now (look at the right menu), because each letter still comes as separate object, there are plenty of unnecessary color changes. We would like to eliminate them. To achieve these results, click:
"Edit" --> "Select All" (selecting all objects)
"Edit" --> "Join" (creating single object from multiple ones)
"Edit" --> "Center" --> "Both Axes" (centering the entire word "Laura" in hoop)
"Edit" --> "Sort Colors" (to make all red parts embroider together, and all blue ones - together).
The following warning will pop up: 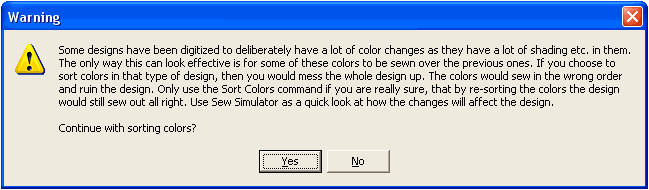
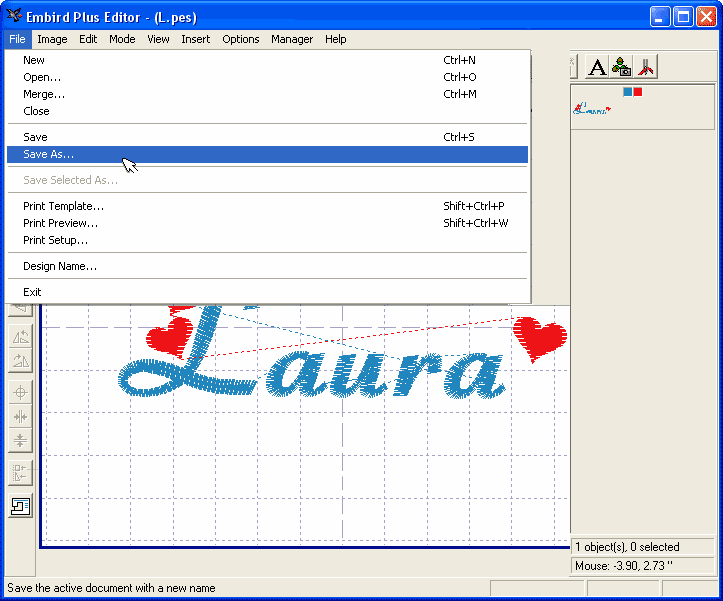
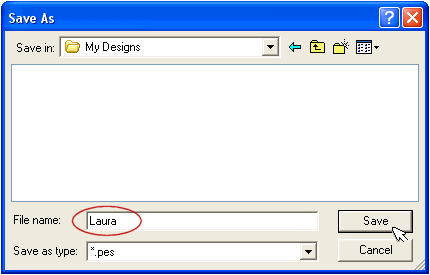
7. If you're sure that it's ok to sort, continue. In our example it's absolutely safe. But always look at the design and at how you're going to use it, before sorting colors. After you've finished sorting colors, the design is ready. Just save it as separate file, by clicking "File" --> "Save As". Give the new file a significant name (in our case it's "Laura.pes"). It's important to always give significant names to your files, because this way you can easily know what is located inside.
That's all. Just transfer the ready design to media that your machine can read, and start embroidering. Of course, you may join many designs this way. Not only font letters.
If you'd like to get embroidery fonts or designs for machine embroidery - please visit these links:
|
|


